Enter the Cabochon Reclamation And Pry stick, CRAP stick for ease, humor, and brevity. Despite the chucklesome name of this new tool, it packs a lot of figurative CRAP in one alloyed metallic stick.
In recent history tools like this CRAP have been called prong lifters or stone removal tools (Amazon link attached)
They are pretty basic tools. Normally constructed from carbon (hardening steel) or mild (non hardening) steel of a single thickness with notches cut on both sides.
Sometimes called unsetting tool. Versions of this can be homemade and can work quite well if you want to skip my CRAP and its long winded inauguration check out this link to Interweave on making a basic unsetting tool HERE
The idea is to use the supplied notches to assist you in opening prongs or a bezel to rescue a cabochon or gemstone in the midsts of experiencing a setting calamity or lovingly being in a recycled for an inspired new project.
I tend to be a simple man, I think I own six of them. Since I started metalsmithing in 2016 I think they have been brought into service maybe that many times. Why?
I think “why?” Has more to do with the “what” of the issue.
What does the tool do? These tools do pretty much one thing and the design probably hasn’t changed decades. I love tools, but I tend to be IN LOVE with tools that do a lot of CRAP.
While pondering life, tools, what my dogs must have eaten to smell that bad I’ve come to a conclusion, crap I use often stays closer to the main area of my workspace. CRAP I seldom use gets relegated to a dark drawer and forgotten about until it is the only crap for the job. Some tools are perfectly suited for single tasks, its their job and that’s okay.
Enough with that other CRAP and lets talk about the good stuff.
Here is a little diagram to help you understand what the CRAP i'm talking about in reference to this tool.
A: Emotional support beverage opener (I prefer non- alcoholic ginger ale or tonic)
B: Wire bending slot
C: Finger placement pads
D: Small pry points
E: Key chain hangy hole option or leverage point
F: General porpoise handle (Yes,I know that’s a air-breathing, warm-blooded mammal that nurse their young but it auto corrected and I liked it, so it stayed)
G: .250 inch hex hole to accept screwdriver or Allen wrench tips
H: Tapered flat pry wedge
I: Tapered talon for opening bezels or for your general prying needs
Some of the early pictures reflect a sightly different looking design such as this photo.
Short story long…
As I design a new tool I start in very metaphorically biological way, from the point of view of an insect.
I start with an idea or egg. This is where everything develops in my trusty brain bucket.
Eventually this tool idea emerges a prototype the larva. Think tool design baby pictures.
Inevitably this metaphoric wormlike CRAP needs some pondering, adjusting and nourishment to grow.
All this growth pushes the tool into the second or third redesign and into an awkward fella insects call a pupa.
The pupa is a teenager that wants to be on your bench with all of the other fun jewelry tools but isn’t quite ready for the responsibility.
Finally after its voice changes and it stops growing and the final design is released we are the proud parent or tool owner of an adult tool ready to see the world and make its place at your bench.
This is a long winded way of explaining that a lot of the pictures you may see online are my tool babies growing up.
Adult tool!
Now that i have an adult aged tool to release upon the world lets revisit, "What"
First this CRAP is available in two options at the moment Grade 5 Titanium and 304 stainless steel.
A: Arguably the most useful part of this tool from an emotional support standpoint. The bottle opener. Chances are good if you need to employ the use of this tool you may also need to take a break and enjoy a beverage, because CRAP happens.
B: The wire bending slot can be used to maneuver a prong or assist you in making a tight bend in a wire you are working on.
C: Comfortable finger placement points that allow you to choke up on the tool for more precise crap.
D: Several shapes of pry points give options for rock-ribbed demolition jobs or tricky stone rescue business dealings.
E: Keychain or hangy hole. Additionally this hole can be used as a leverage point when using the tapered wedge. If you need to pry open a fold form or provide more of a rotational prying action insert a rod into the hole and use the rod as a handle for stronger rotational prying.
F: General porpoise handle for all your gripping and sea mammal needs.
G: I am most excited to add this into the final adult tool. This is a .250 inch hex hole that fits standard 1/4 inch hex screw driver tips. This CRAP is also a screwdriver, Allen wrench, small socket wrench, and more depending your tip.
H: The tapered wedge looks like a pry bar. The tool is .187 inch thick except at this wedge. The wedge tapers from .187 inch to .020 inch. The rapid taper works to quickly pry open an element, bezel and even a fold form.
I: The tapered talon is attached to one end of the wedge. This added talon provides a sharp tapered point for insertion and prying.
[ Imagine the glorious screech of the bald eagle.]
This CRAP will be getting its own Youtube Video. However, at the moment I have set some synthetic calibrated stones in the most CRAP inspired way to give a little pictorial about this this CRAP works.
Here is the side profile of the Tapered wedge (H). The slightly rounded fast taper allows for quick opening and prying action .
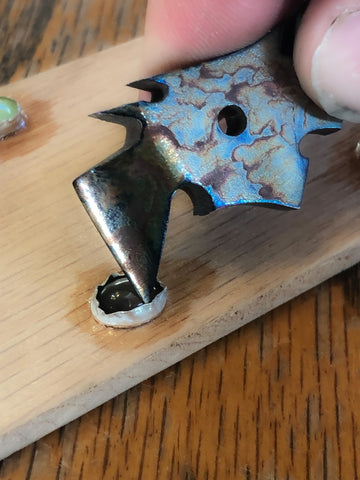
Using the tapered talon I am inserting just the tip this this CRAP between the bezel and the stone. I polish the working surfaces of the tool so stone damage will hopefully be minimal or nil.
With the tip inserted I use a slight prying combined with a pull and a wiggle [sounds like a dance].
Here are a few slightly different angles of whats happening.
Before you know it this CRAP is finished. I photographed one more example to help those visual folks like myself.
Options:
1.The stainless steel option will be polished metal. this CRAP is made to order in Right and left hand options
I hope this CRAP's for you !
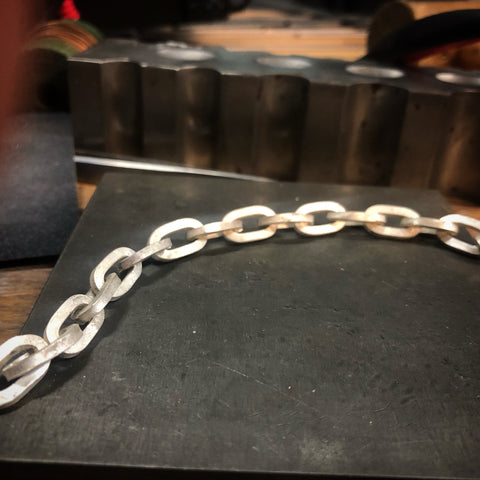
What is permanent jewelry?
Simply, permanent jewelry is jewelry that you can’t take off. Instead of a traditional clasp, the two loose ends of the chain are welded or fused together using a jewelry pulse arc welder.
What is a pulse arc welder?
Pulse arc welders use a method involving electrical energy to produce welds. Using a tungsten electrode an arc is generated when the grounded workpiece touches the electrode. The generated arc creates a high-temperature pulse of plasma that can melt metal (i.e. weld). Simply: electricity, heat, and angry magic pixies.
Pulse arc welders typically use an argon shielding gas to protect the welds from oxidation. Argon is an inert gas that is heavier than oxygen. A little puff of argon pushes the oxygen out of the weld area and makes for cleaner pretty welds.
Paying for welders in the jewelry studio.
Welders cost anywhere from $1k to over $8K depending on the model, size and power.
That is a lot of money for a small business or hobby goldsmith. In my own shop / studio I look at things from the perspective of versatility and cost effectiveness.
Lets use the most basic but still capable jewelry welder as an example. The mPulse 30, which currently runs approximately $2.3K .
mPulse 30
I currently charge a base $65 base welder fee on all repairs. This includes pushing the welder on button and 10-15 ish welds. After the 10-15 welds there is a reasonable sliding scale of price increase.
There are a few reasons for this pricing:
Time for some rough math!
mPulse 30 $2300
Base $65
2300 divided by 65 = 35.38 jobs
Job 36 and thereafter pays for consumables and PROFIT.
I don’t currently offer permanent jewelry but it seems like getting 36 jobs doing a few pop up shows should be pretty easy with the right marketing and venue selection.
Other welder models
The mPulse 30 is very capable but I would 100% advise upgrading the the mPulse 30 plus. It comes with a welder safe microscope that increases the usefulness of the welder.
Current Orion models and price scales at the time of this writing:
mPulse 30 | $ |
mPulse Plus | $$ |
100c | $$$ |
150s | $$$$ |
250s | $$$$$ |
200i | $$$$$$ |
There is a wide range of welder models out there. I currently have the 200i it is the most powerful and adjustable out of the jewelry line of welders. I currently use mine for jewelry, tool manufacturing and tool modification.
As the models get more expensive you can expect an increase in welder power and adjustability of the welds a welder nerds dream) despite the lower price range of the mPulse welders I have played with them a lot and found them absolutely sufficient for repairs and studio work.
Addition equipment not normally mentioned
Argon tank/gas
There are argon gas mail order programs through Sunstone that work great if you don’t have a welding gas supplier near you. However, typically a tank is purchased full from a welding gas supplier and then traded out for a full tank when empty.
The first time you purchase your argon and tank the price will be higher because you are also punching the tank (rental if you will). Then after the tank is empty you trade your empty for a full tank at your supplier and only pay for the gas. Argon refills cost me around $65 for a 20-30 standard cubic foot (scf) tank at my supplier. A 20 scf tank can last me a few months depending on how much welding I am doing.
Regulator
A inert gas regulator will be necessary to regulate the gas flow from the tank to your welder. I highly recommend getting one from a jewelry welding supplier because they are tuned to allow a finer adjustment
Because punny
Grounding attachments
Grounding attachments are key to comfortable work holding and ease of use. Lion Punch forge has this one for sale (special order) and the capability to make custom attachments. We also have YouTube video showing you how to make your own.
Electrodes
Electrodes are the magic maker with welders even if you purchase a $10k welder if you have the wrong electrodes or poorly shaped electrodes you will get poor welds. Fortunately this isn’t hard to do. Electrodes are consumables and will eventually need replacing when the get too short from sharpening -Good news after a few years of use I still don’t need more, they last a long time.
Sharpening electrodes can be done on a diamond wheel in a flex shaft super quick!
or use a specialized tool designed to make it go faster and more mobile:
Pilot Electrode Sharpener for Permanent Jewelry
I hope this basic overview helps you think about welders and more specialized tools in a different light.
Specialized tools can make help you work faster and accomplish more tasks. Leave a comment if you would like to see more blog entries like this either on other tools or expanding on these details and maybe show some fun tricks using a welder.
Chris
Learning new skills:
]]>
Traditionally the ring mandrel was made of wood and sometimes wrapped in a thin layer of metal to protect the surface. Eventually steel working technology and casting processes allowed for the beautifully polished ones we see for sale at manufacturers like Pepetools.
Current market offerings for jewelry mandrels include those for making bezels, chain, rings, and wire forming.
In this blog post I am going to focus on chain making. Specifically, oval links and variations of chain made from oval links such as the popular 'paperclip" style chain. To assist in making sure we all know what I am talking about a paperclip style chain is basically an elongated oval like this :
[Made with 16 gauge copper wire & Large 3mm mandrel]
When I was taught to make oval links the order of operations looked something like this:
Quite a few steps for an oval link starting with a circle. This isn’t the only process that I have learned over the years.
Another method was to take a popsicle stick and use it as a makeshift mandrel for creating a ready made oval. This process looks like this for a standpoint of order of operations:
From a perspective of time, this cuts at least two steps out. As a maker and entrepreneur faster, better, and less steps means more profit and less time invested.
Another method, outlined in Alan Reveres book Professional Jewelry Making, uses a thick round brass wire rolled flat in a mill on two sides to make an elongated oval. This elongated brass oval wire is then used as your mandrel. This method works well for the cuban or curb link.
First, What if I wanted an oval link smaller or larger than a popsicle stick. Secondly, as much as I like popsicles I can only eat so many.
The logical folks will retort, citing the fact I can buy popsicle less sticks in bulk. I am aware, but this is less of a win/win because, popsicles .
Popsicle sticks are also made from a soft wood that has a limited lifespan in the metalsmith realm of use. Resulting in making them a truly a disposable or consumable tool. [pun intended]
The Alan Revere method using brass rod works great but again limits the maker to a select few link sizes mostly dependent on the size of the brass rod available.
The tool itself had to meet a few pre-established criteria:
When selecting a material, stainless steel quickly rose to the top of my list for material choices.
Stainless steel can be purchased in a variety of thicknesses, widths and lengths. It resists rusting, and is generally very durable. The 304 stainless mandrels will not be heat treated and 304 is tough material that holds up to the heat of a torch.
After playing around with some stainless steel in .125 or 3mm thickness, I created my first prototypes and production run from this material. The set included three lengths of stainless bars all 12 inches long:
This turned out to be an excellent choice for the product. However, I didn’t really address the versatile aspect of my criteria.
The paperclip mandrels being offered currently come in 9 different configurations.
Size:
The mandrels come in three different sizes:
Here are the step heights for each of the sizes.
Step:
Since making chain requires you to wrap a wire around the mandrel the outside dimensions of you links will change depending on the gauge of wire you choose. 10 gauge is thicker than 16 gauge so you can change the link appearance by changing your wire thickness. (options!)
However, The inside measurements of your link will stay the same as the mandrel measurements. This can be important when working with large gauge wire like 14-10 gauge.
Example
Oval links can be problematic not just with the method of stretching round links and having a third of them pop after fusing or soldering.
Removing an oval coil of wire from an oval mandrel is remarkably more difficult than a round coil. Likely due to radial bending forces and the increased surface area interaction with the wire and mandrel.
I have two methods that may assist you in being more successful and faster at removing your links.
These two tips should help you get your coil off your mandrel smoothly.
There are a couple schools of thought when it comes to cutting your links. The good old jewelers saw like the Lion Punch Forge Haymaker can do a fine job!
Mount your coil in a ring vice and saw them all together our product team member, Jen Surine, can be seen doing this in her Instagram reel
Since i make tools i have devised a way to use my GRS Bench pin system to mount a chuck, I call it the marmot. Marmots are my favorite of chuck family of mammals .
My Marmot isn't as cute but is probably more useful in the studio than this little cuddle muffin.
The chuck holds a split mandrel so you can slide your coil over the split mandrel and saw your links. Making this tool was something i did to make sawing my links at the link radius easier.
Using the stretch your round link oval method a lot of folks would position their solder or fusion joint on the long portion of the link.
This is done to mitigate potential "popping" of the joint due to a less stressful load being applied to the straight portions of the link. It can work well! but...
lets think about how oval chains lay when around the neck. Radius to radius contact. so if an oval chain was cut on the longer sides of the link it will look like this:
This arrangement leaves your solder joints visible when the chain hangs around your clients neck. Additionally since the solder joints are visible when wearing you may have to spend some more time inspecting and making sure everything is acceptable.
Compared to :
Radius joints may be a little require a little more practice but ultimately the natural way the chain lays hides the joint making a cleaner looking chain.
Like this:
Made with 12 gauge square SS wire and a medium 3mm mandrel
I hope this helps! please reach out if you have any questions. Here are a couple Youtube videos that may help.
Chris
]]>
We love our Titanium (Ti) at Lion Punch Forge, but why is it so special. Ti is largely used in the Aerospace, bio medical industry, situations where corrosion resistance and good high temperature performance are important.
Unfortunately, Ti is also expensive. However, our desire to make tools the way we think tools should be made outweighs some cost considerations.
When we design something new material sciences are a big factor in where we start. the question, "What physical material will be the best for the intended application" must be answered. We want to build tools that last your lifetime. Durable, quality and enjoyable to use plus having a fun name helps.
For the Ti Tweezy we chose Titanium because it is an extremely durable, corrosion resistant, limited thermal conductivity, and its very light. In fact Ti is 40% lighter than steel but as strong as high-strength steel.
Current market offerings for soldering tweezers are typically steel. The steel varieties are made of several parts that are welded, soldered or riveted together.
The Ti Tweezies (I giggle every time I type that) are precision laser cut from grade 5 titanium. The one piece construction means no mechanical joint failures. Since Ti has decent spring back properties they will stay nice an springy
Additionally These multifunctional tools
Ti Tweezies feature:
Pictured here is an example of some of the colors.
These are some of the prototypes i was working on before deciding on the production design
(Two on the far right)
For those of you who may not know my smith sister, Michelle of Lierreworks filigree.
In my personal and professional opinion Michelle is the next GREAT emerging filigree artist. It is an honor to call her a friend and more truly a smith sister.
Over the last few (6) months Michelle and I have been working on developing what is know known as the Soldering Stencils by Lierre.
These titanium frames are a fantasic new offering we are excited to release on November 18th 2022. More information coming soon!
Here is a message from Michelle about our collaboration.
Dear metalsmith friends,
I would like to introduce you to the “Soldering Stencils!” I am super excited about these and am grateful for Chris who made all of this possible.
So what are they?
In essence they are titanium frames that you can solder inside of!
My idea came from the filigree community where they make open-work jewelry out of many small soldered pieces. Traditionally, artists would make their own templates out of thick brass or copper wire, place all their small bits inside, and then apply solder by either sprinkling or dabbing it in a granule form and solder them together. The thickness of the outer wire would generally keep it from adhering to the pieces because of the difference in heat conduction.So in an effort to improve on the tradition, Chris and I came up with frames in titanium that are durable, don’t create as much of a heat sink, and are exact in their shapes; more exact than I could ever be if I made my own the old fashioned way.
I am pretty sure they can also go in the pickle without an issue. (Chris?)** my first trials I used some solder paste and also solder chips placed with a tiny paint brush and I am happy to say that none of my silver bits adhered to the titanium.
So what we want to know is how could you use it?! I would love to see all different ways of creating something with the stencils. Could you fuse in them? What about creating something outside the frame instead of inside? Could you use balls, tube, granulation, scraps, mesh, wire, different materials?
Sky is the limit! I look forward to hearing your feedback and seeing your creations.
Michelle
**Chris’ Note
Titanium will be completely unaffected by an acid pickle. Some of the 300 series stainless steels are also safe for long term immersion in pickle.
]]>